If you feel that your travel images are flat and boring and you often wonder how some folks always have pictures that blow you away, there is hope ahead! Let’s call this the frugal guide to better images and I promise you probably don’t need a new camera to get there.
“You take great pictures–you must have a great camera!” That comment is quite far from the truth and really annoys me when I hear it. In fact, many photographers have taken outstanding images with only their mobile phones as equipment and they have done so by following simple steps and applying them with care. Some people are making a living by writing books and blogging about shooting images with their trusty iPhone. So it’s really not about the camera.
There are countless tips out there to help improve your photography. Here are my personal thoughts and tips. Hopefully, these will help to take your images to another level without breaking the bank.
1. It’s Not the Camera, It’s Your Eye
“The most important part of a camera is the 12 inches behind it.” – Ansel Adams
Someone recently told me “I need a better camera”. “Why?” I asked. “Because I want to take better pictures.” It happens that this person, in my opinion, takes very nice travel photos but she is determined to get a better camera. Don’t get me wrong, there are many reasons why that could be the right thing to do, but her statement nevertheless surprised me. I know for a fact that she mainly uses her camera in automatic mode so it is not a lack of features that is impeding her quest for better images. The camera manual is probably still vacuum-sealed at the bottom of the box it came in, and like most people out there, 90% of the camera’s features are left untouched. As a retired commercial photographer, I had the best equipment out there and even I did not use many of the features available to me. However the features I did need, I could handle with my eyes closed.
Other than a higher pixel count and greater dynamic range, the newer cameras are packed with features that were created to help the photographers at getting better results. But is that really the case? A bad picture is a bad picture whether taken with $10,000 worth of equipment or a mobile phone.
Inversely, a great picture will move your audience; it will bring emotions to the viewer every time their eyes wander across the image. A great photo can be taken with any device, whether it is a phone, an outdated digital camera, small, large, expensive or cheap.
The best camera is the one you have in your hands.
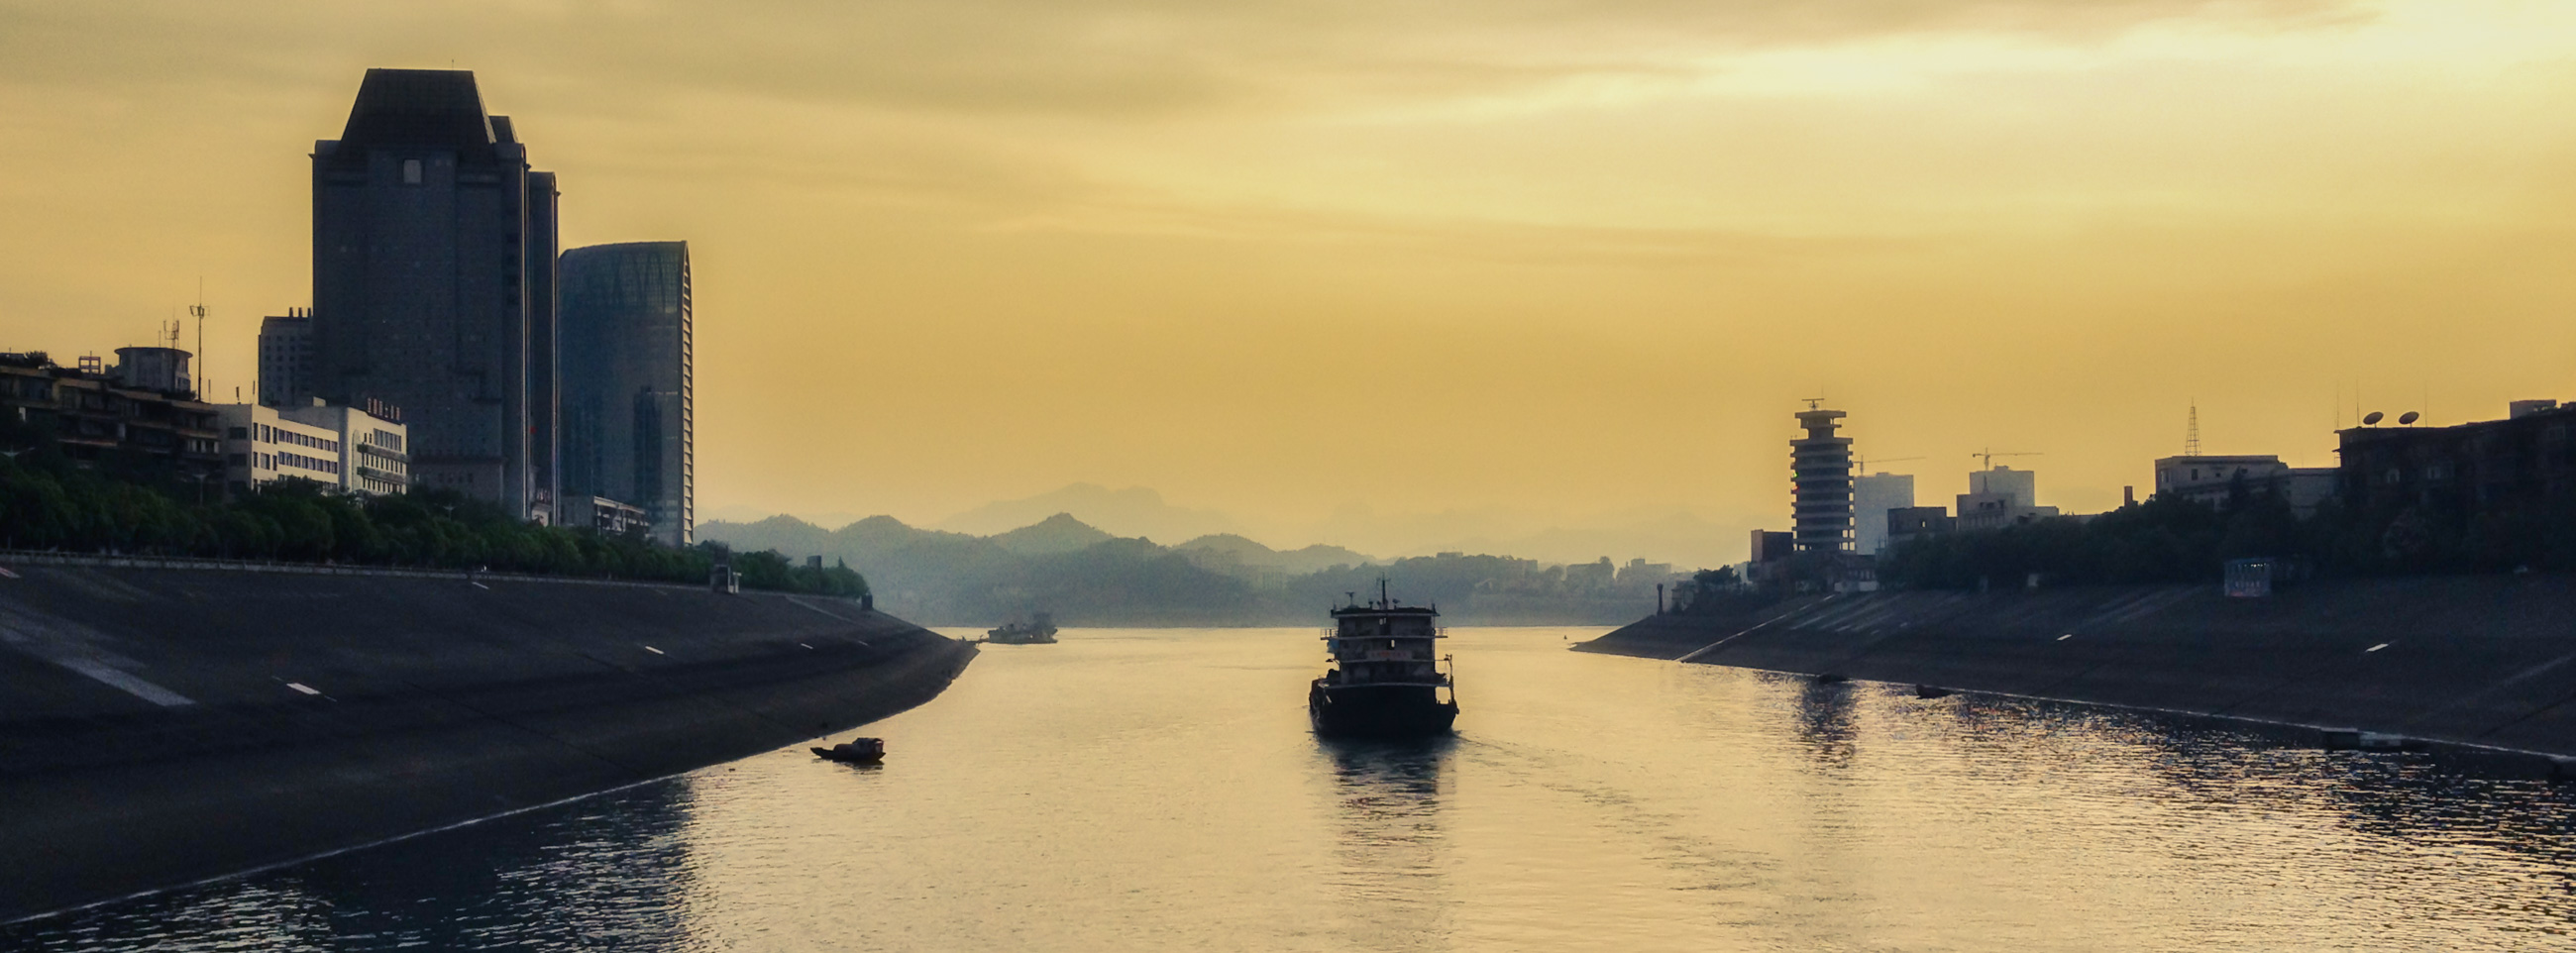
In the above image I had only my iPhone 4S with me. The light and symmetry provided by the boat and the buildings to the left and right of the image just struck my eye. Had I rushed down to my cabin, I would have lost the shot. How much better would have this image been with a “better camera”? Probably not much different on the emotional scale. A better camera would have brought more details here and there but that is not the point of this image in my opinion.
2. Tell the Right Story
If we set aside the usual technical trappings of photography, a good image should tell a story. Who is the audience? Are you immortalizing a moment for your family, to show your friends, for social media, a photo contest or for yourself? What will make that image interesting for that audience? The final image you created should tell a clear story. For example, whether you are recording a place you visited, a close-up of a person’s face, your motorhome parked in a beautiful setting, or a splendid flower, the “story” should be clear to the viewer.
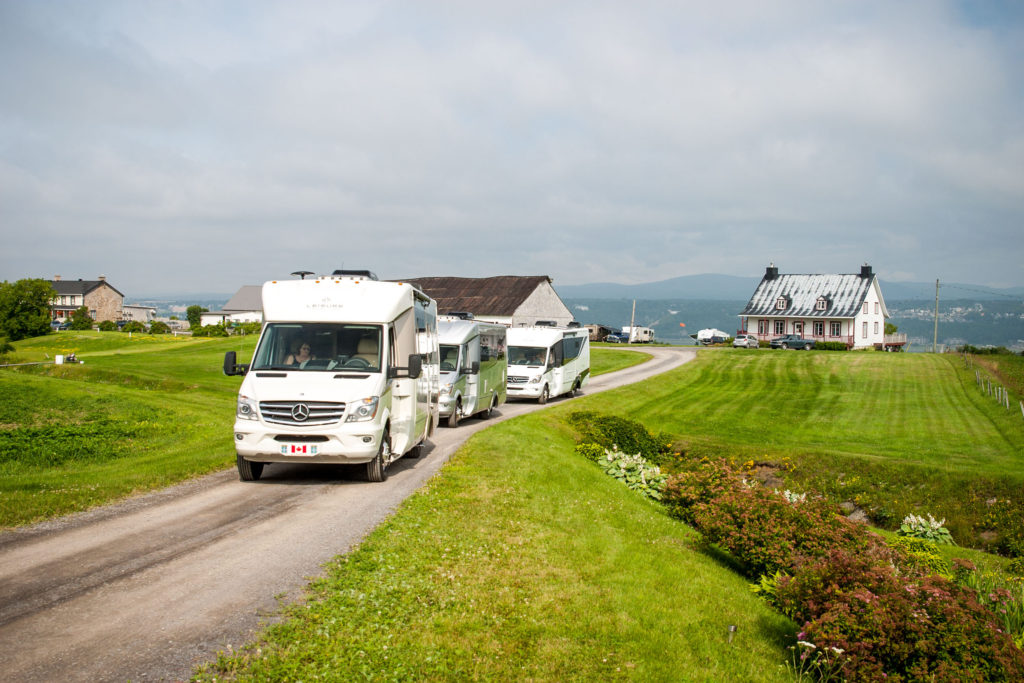
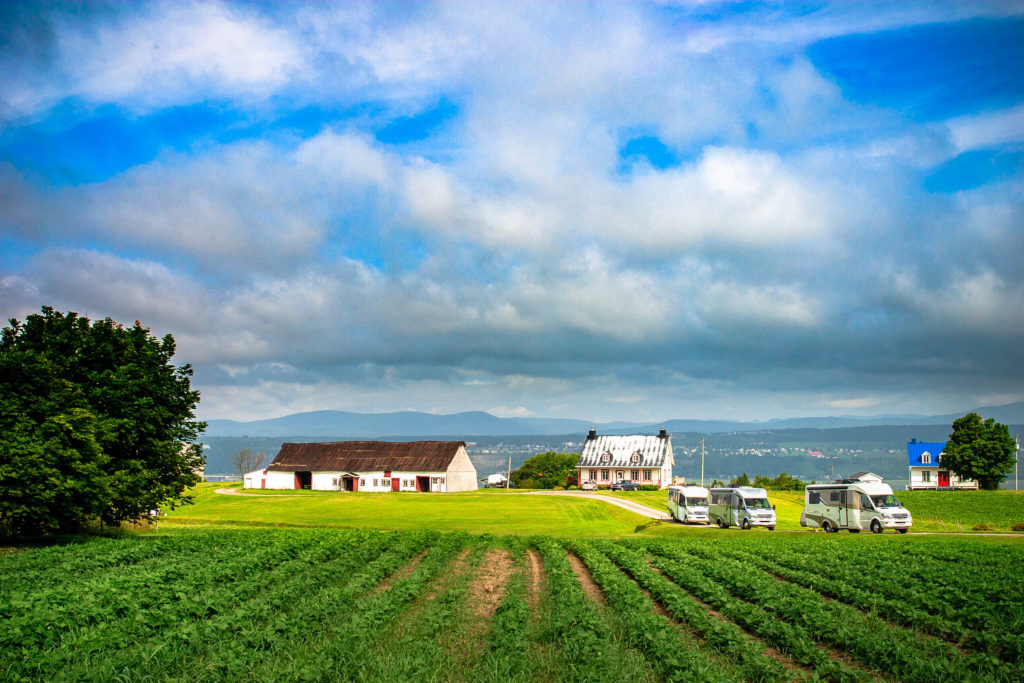
In this example, the two images depict the same scene taken from two different angles. Image A tells the story of three motorhomes in a row on what seems like a country road. Image B tells another story. It shows the three motorhomes in a setting that is much more meaningful and pleasing to the eye. If on one hand, the intent was to tell: “Here are three LTV Unitys in a row” the image A does the job. If on the other hand the compelling story is to say: “Here is the beautiful setting we are leaving behind”, then image B is much stronger than the first.
3. Make the Viewer’s Eyes Travel with Great Composition
The great masters Leonardo Da Vinci, Rembrandt, Van Gogh and others used compositional techniques that are used to this day by artist across the world. The rule of thirds, the golden spiral, leading lines, symmetry, patterns, textures etc. are all ways to arrange the various elements of an image within the frame. These techniques give balance to an image. They make an image more interesting and I am always on the lookout for these elements when I set up to take a picture.
For example, I often use the rule of thirds in my compositions. I place my main subject in one of the intersecting points and I take care of watching the background so there is not a distracting elements “photobombing” the main subject. I also like to place the main subject facing towards the other two thirds of the image. If the subject is a motorhome, the headlights could be facing left or right as long as it has “room” to move within the frame. This being said, rules are made to be broken.
Here are a few examples of various compositions:
This was taken at Chiricahua National Monument AZ. The rock formations lead the eyes to a focal point in the distance situated in one of the “rules of thirds” nodal points. This image is best seen in the very large format.

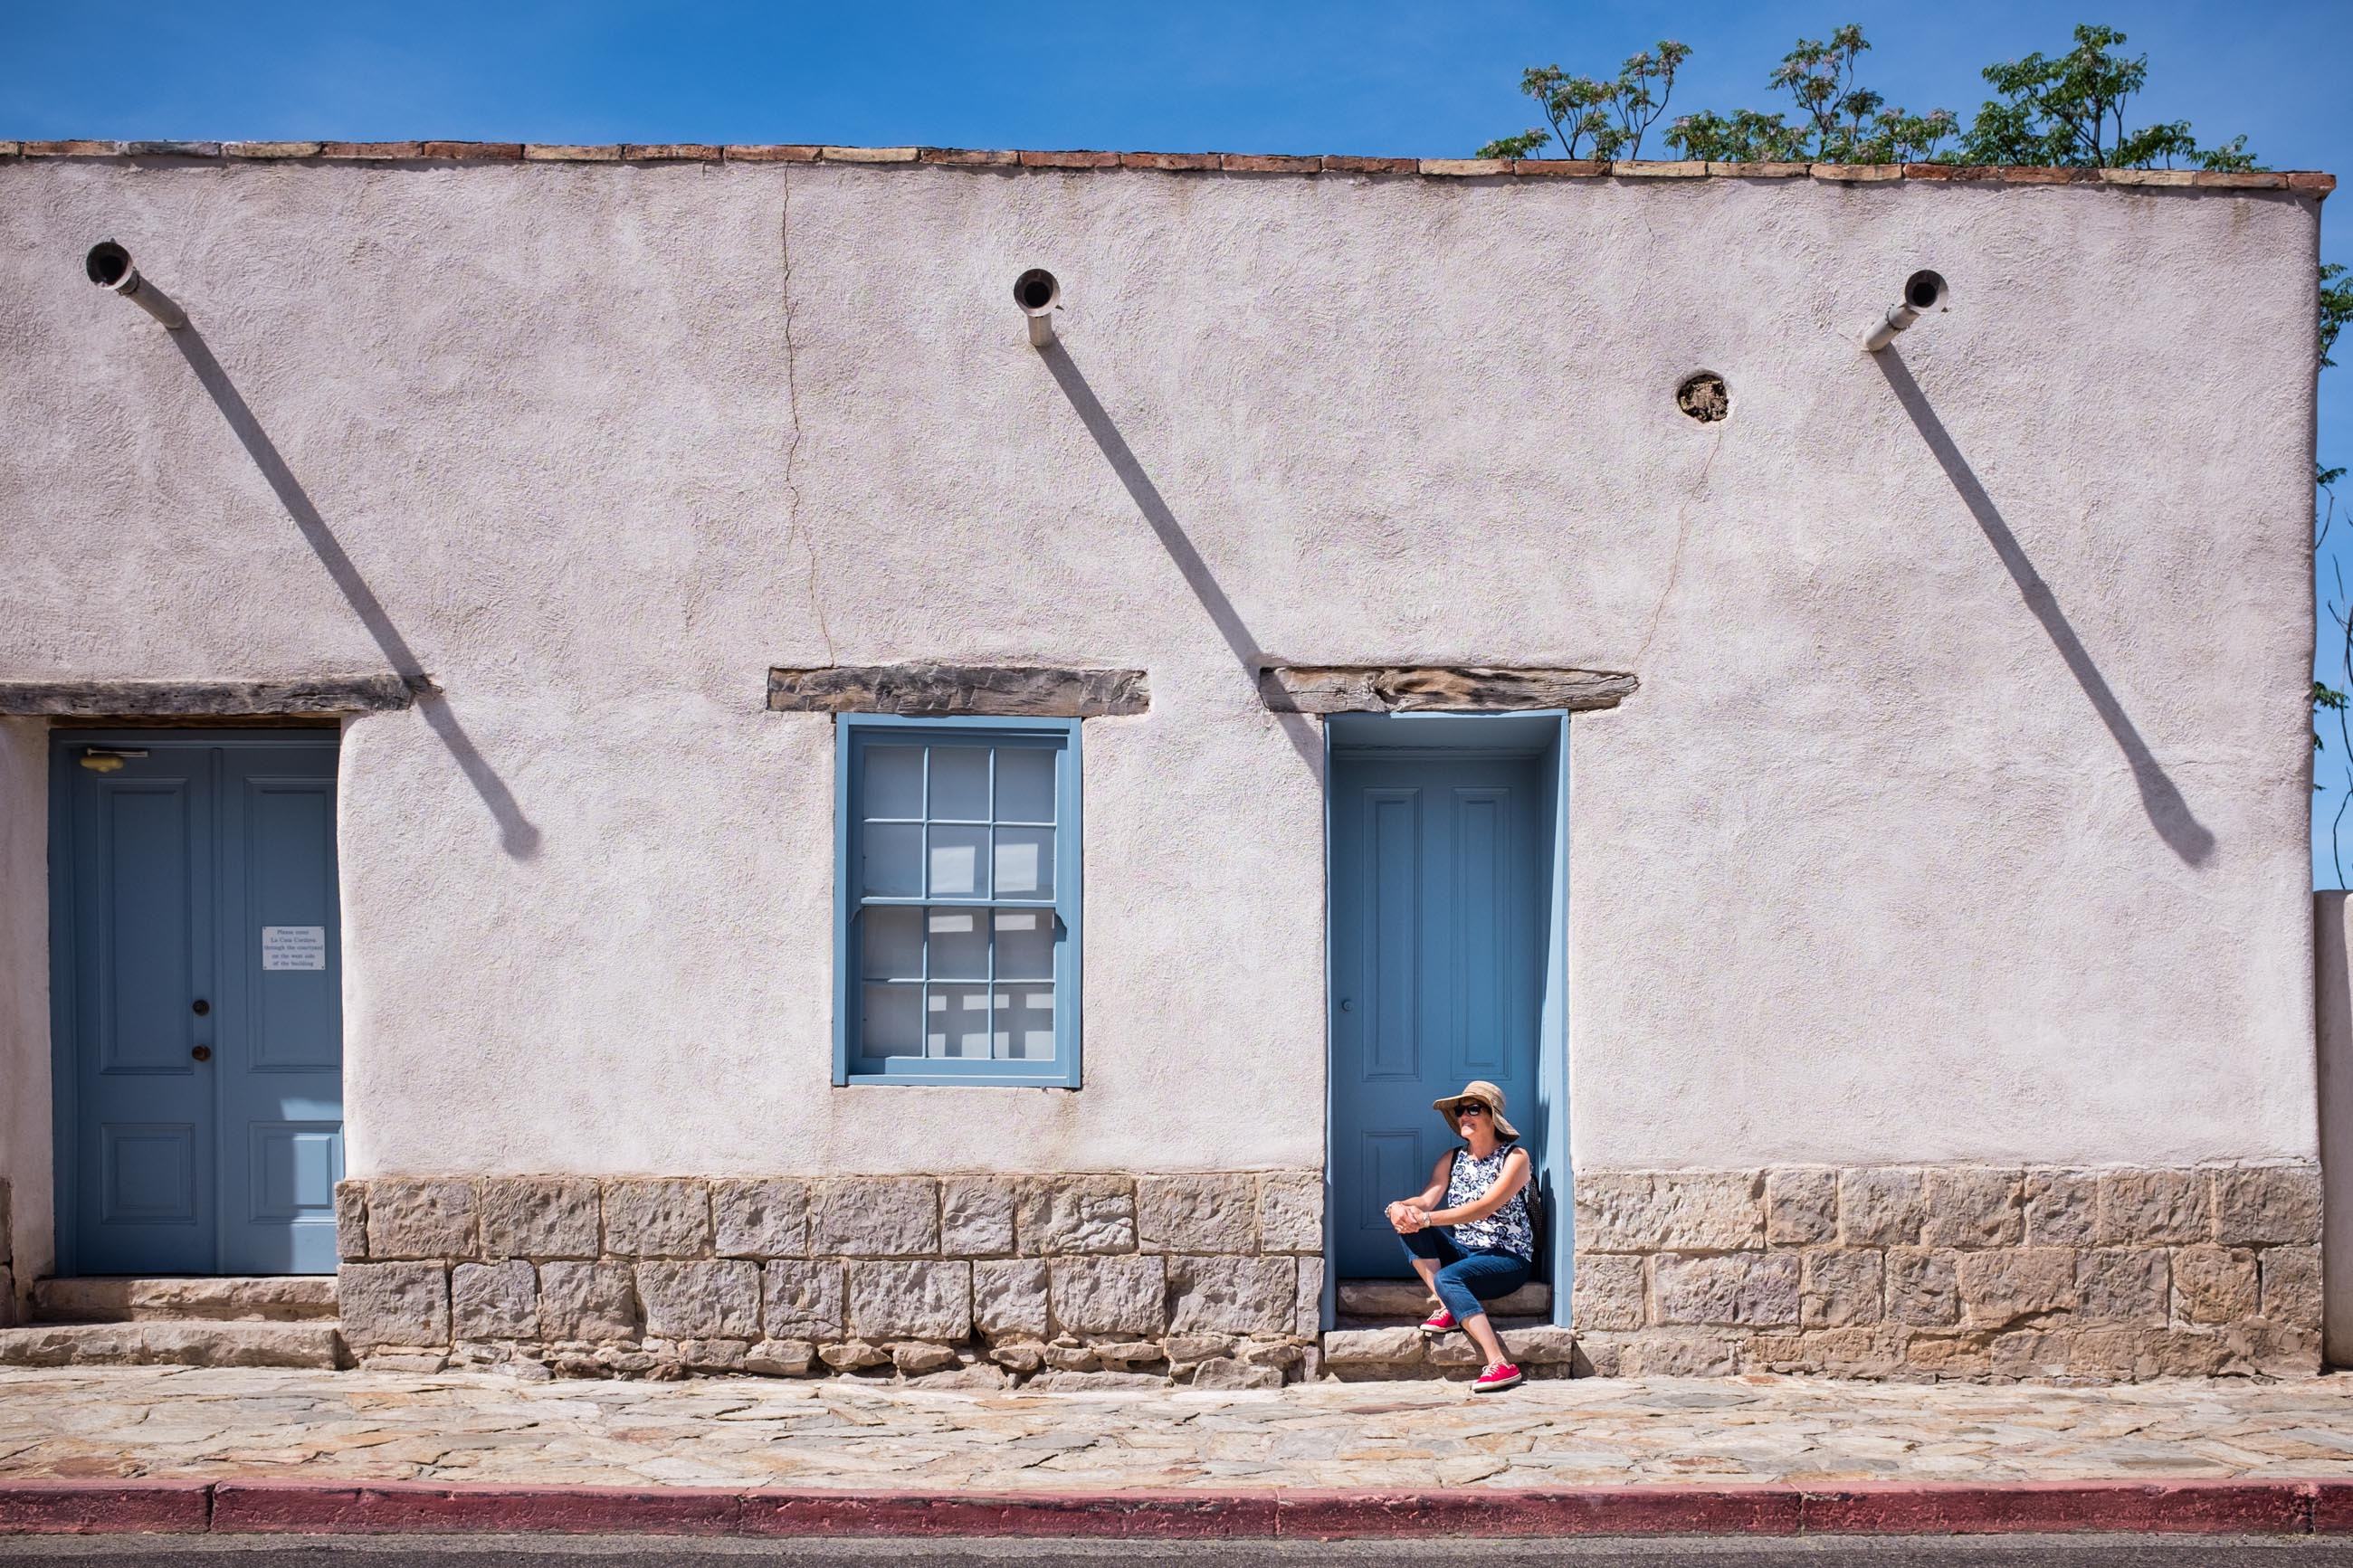
In this next image taken in Tucson, I positioned my wife Joanne to the right of the image, looking towards the left. Notice how the shadow of the center beam, points towards her.
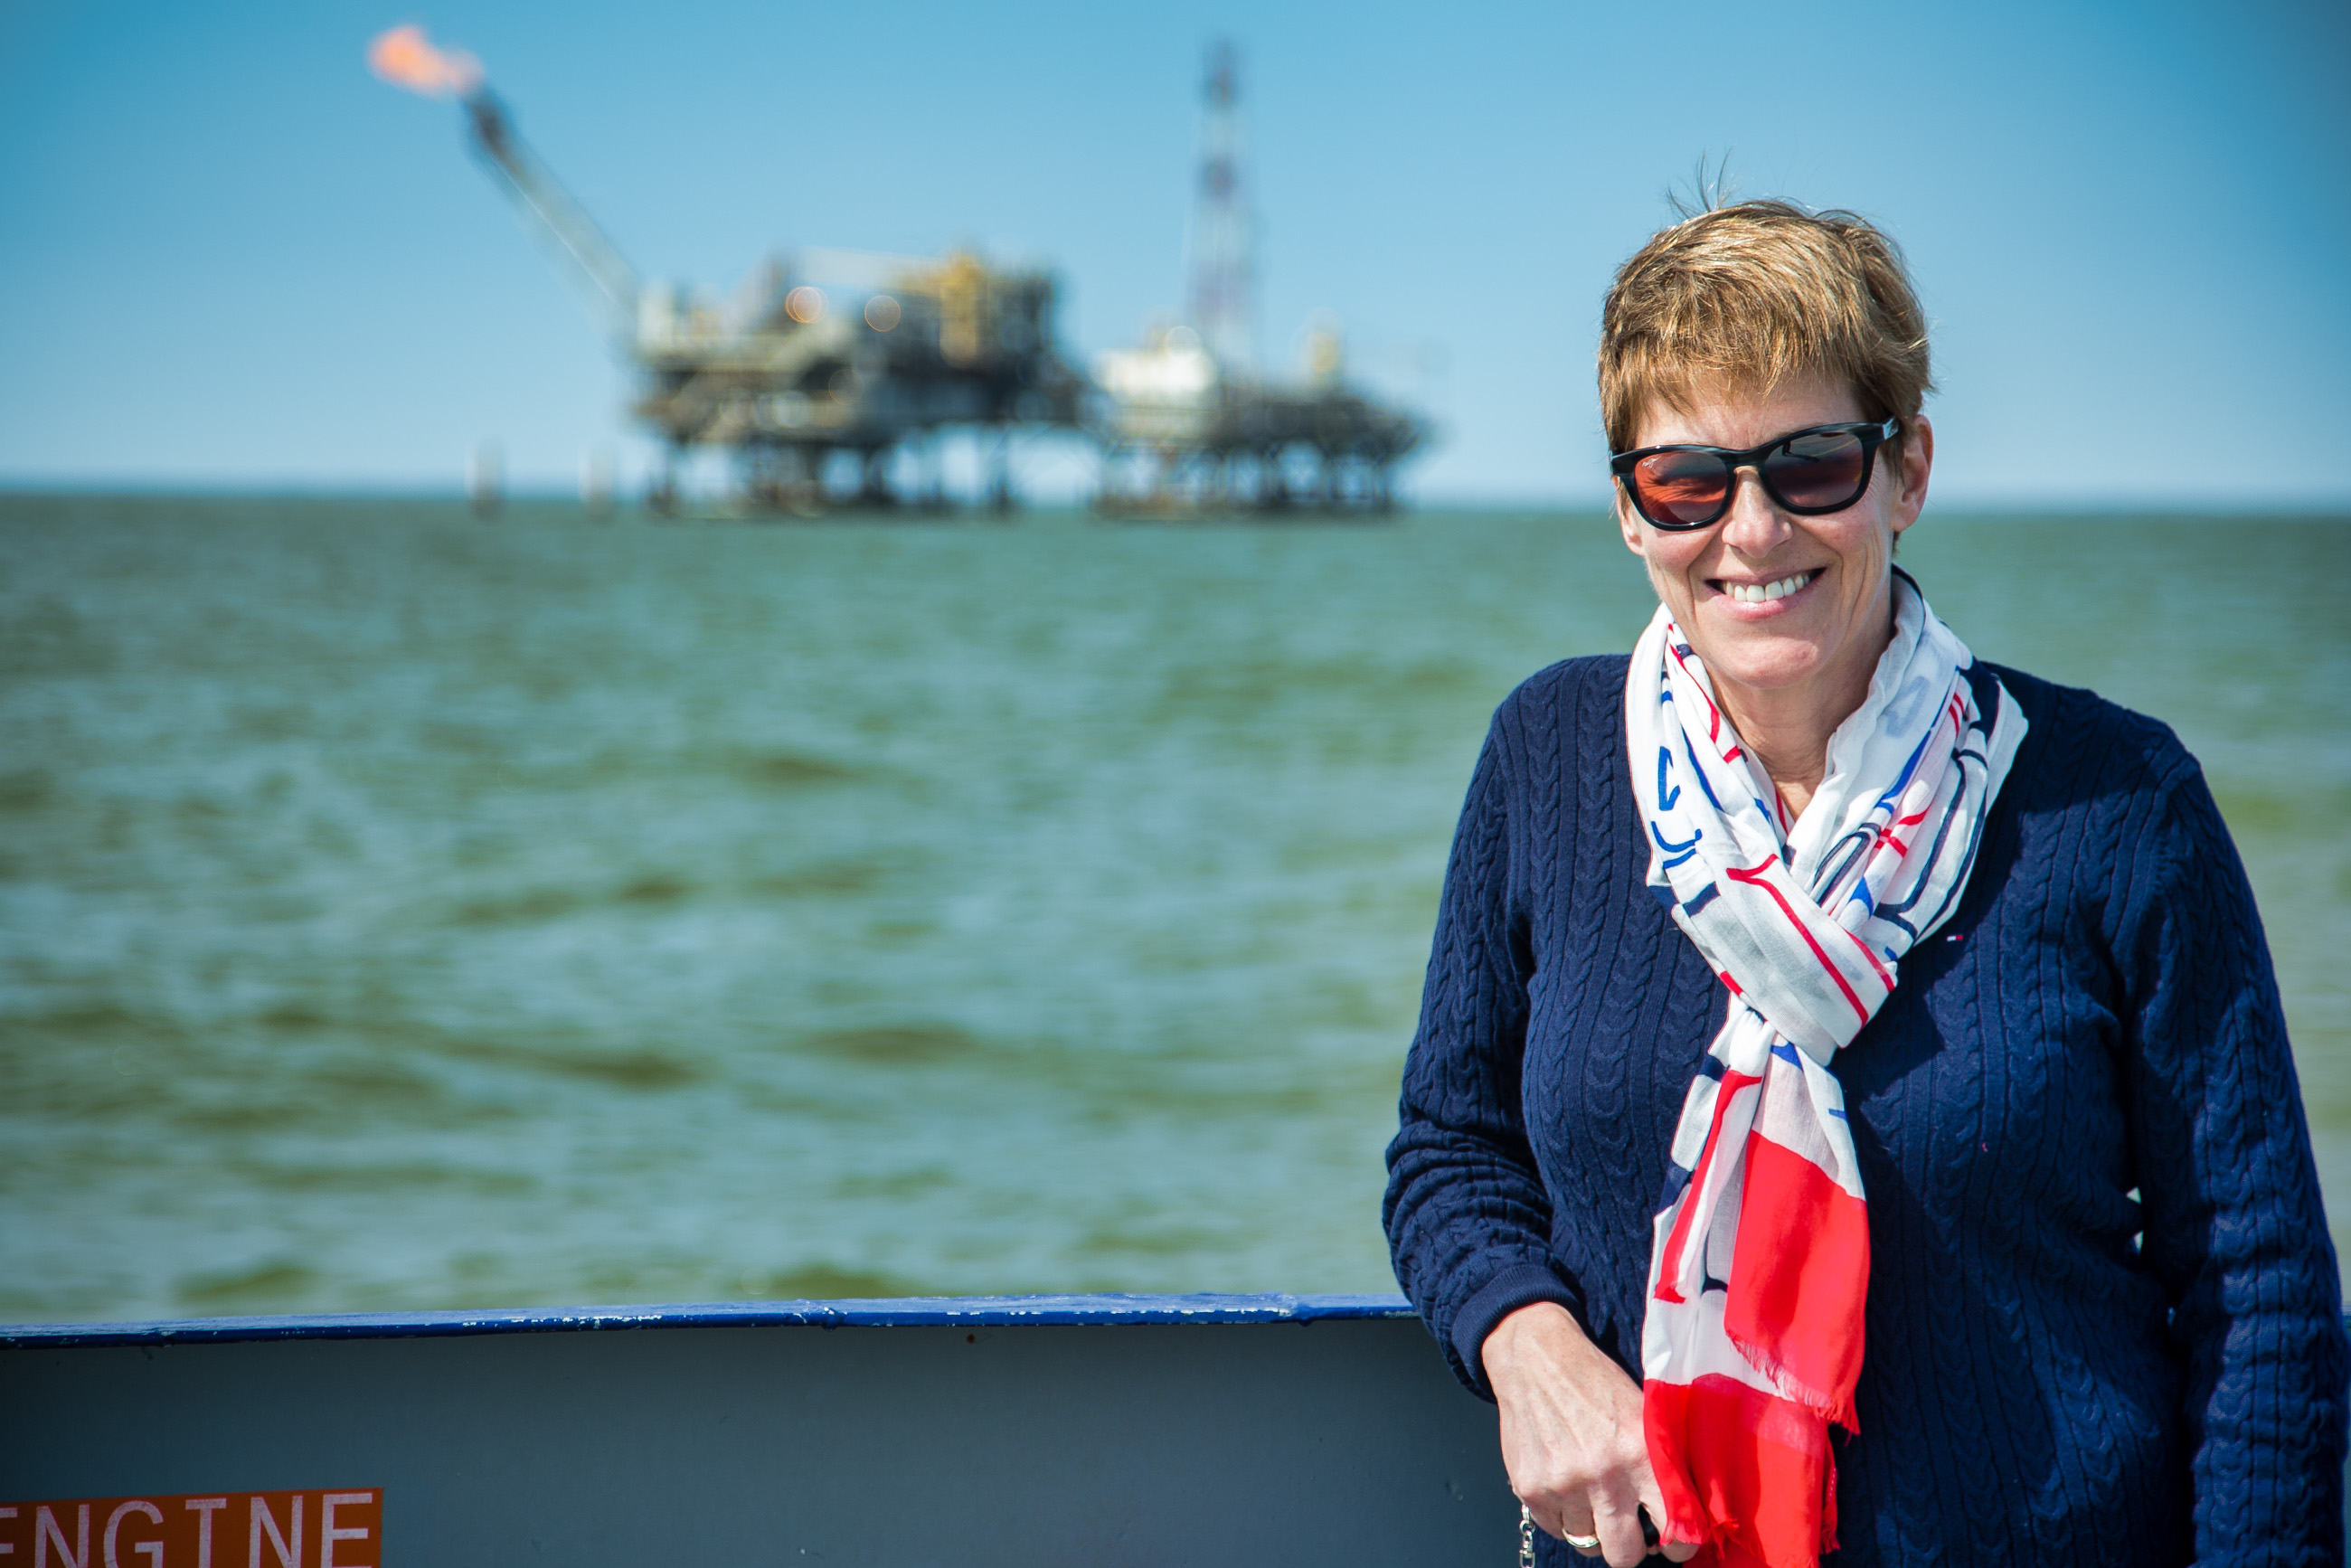
In the example below, we were on the Fort Morgan-Dauphin Island ferry. My wife is positioned camera right and the oil rig gives balance to the image on the left. The oil rig was purposely out of focus but still recognizable. The objective was to create a nice portrait that would also situate the scene effectively without distracting the main subject of the image. Some mobile phones have a feature that allows for depth of field adjustments such as in this example. In this case, I was using my “better” camera with a short depth of field at f/4.0.
4. Great Light Makes All the Difference
“Embrace light. Admire it. Love it. But above all, know light. Know it for all you are worth, and you will know the key to photography.” – George Eastman
On the road we are faced with a variety of lighting situations. You arrive somewhere and will not be there for more than a moment. The scene is beautiful but the light is terrible. Nature deals you the hand it decides to give you.
However there are moments when we are in control of our destiny when it comes to light. But first, what is good light? As a basic rule, light gives shape to things. Light and shadows define an object. When there is no shadow, we call that light “flat” and an object will lose its three-dimensional property. “Good light” has a degree of light, shadow, warmness or coolness on the subject and some of the best moments to get that quality of light are in the morning or at the end of the day when the sun is at an angle, especially in the summer when the angle of the sun is steeper.
Light also has an effect on color. Try to see the color of your shirt in a dark room. You can’t. Therefore a conscious effort needs to be made to capture a scene with the best light possible and believe me, snapping an image with great light is like eating a chocolate-dipped soft ice cream cone. Heaven!
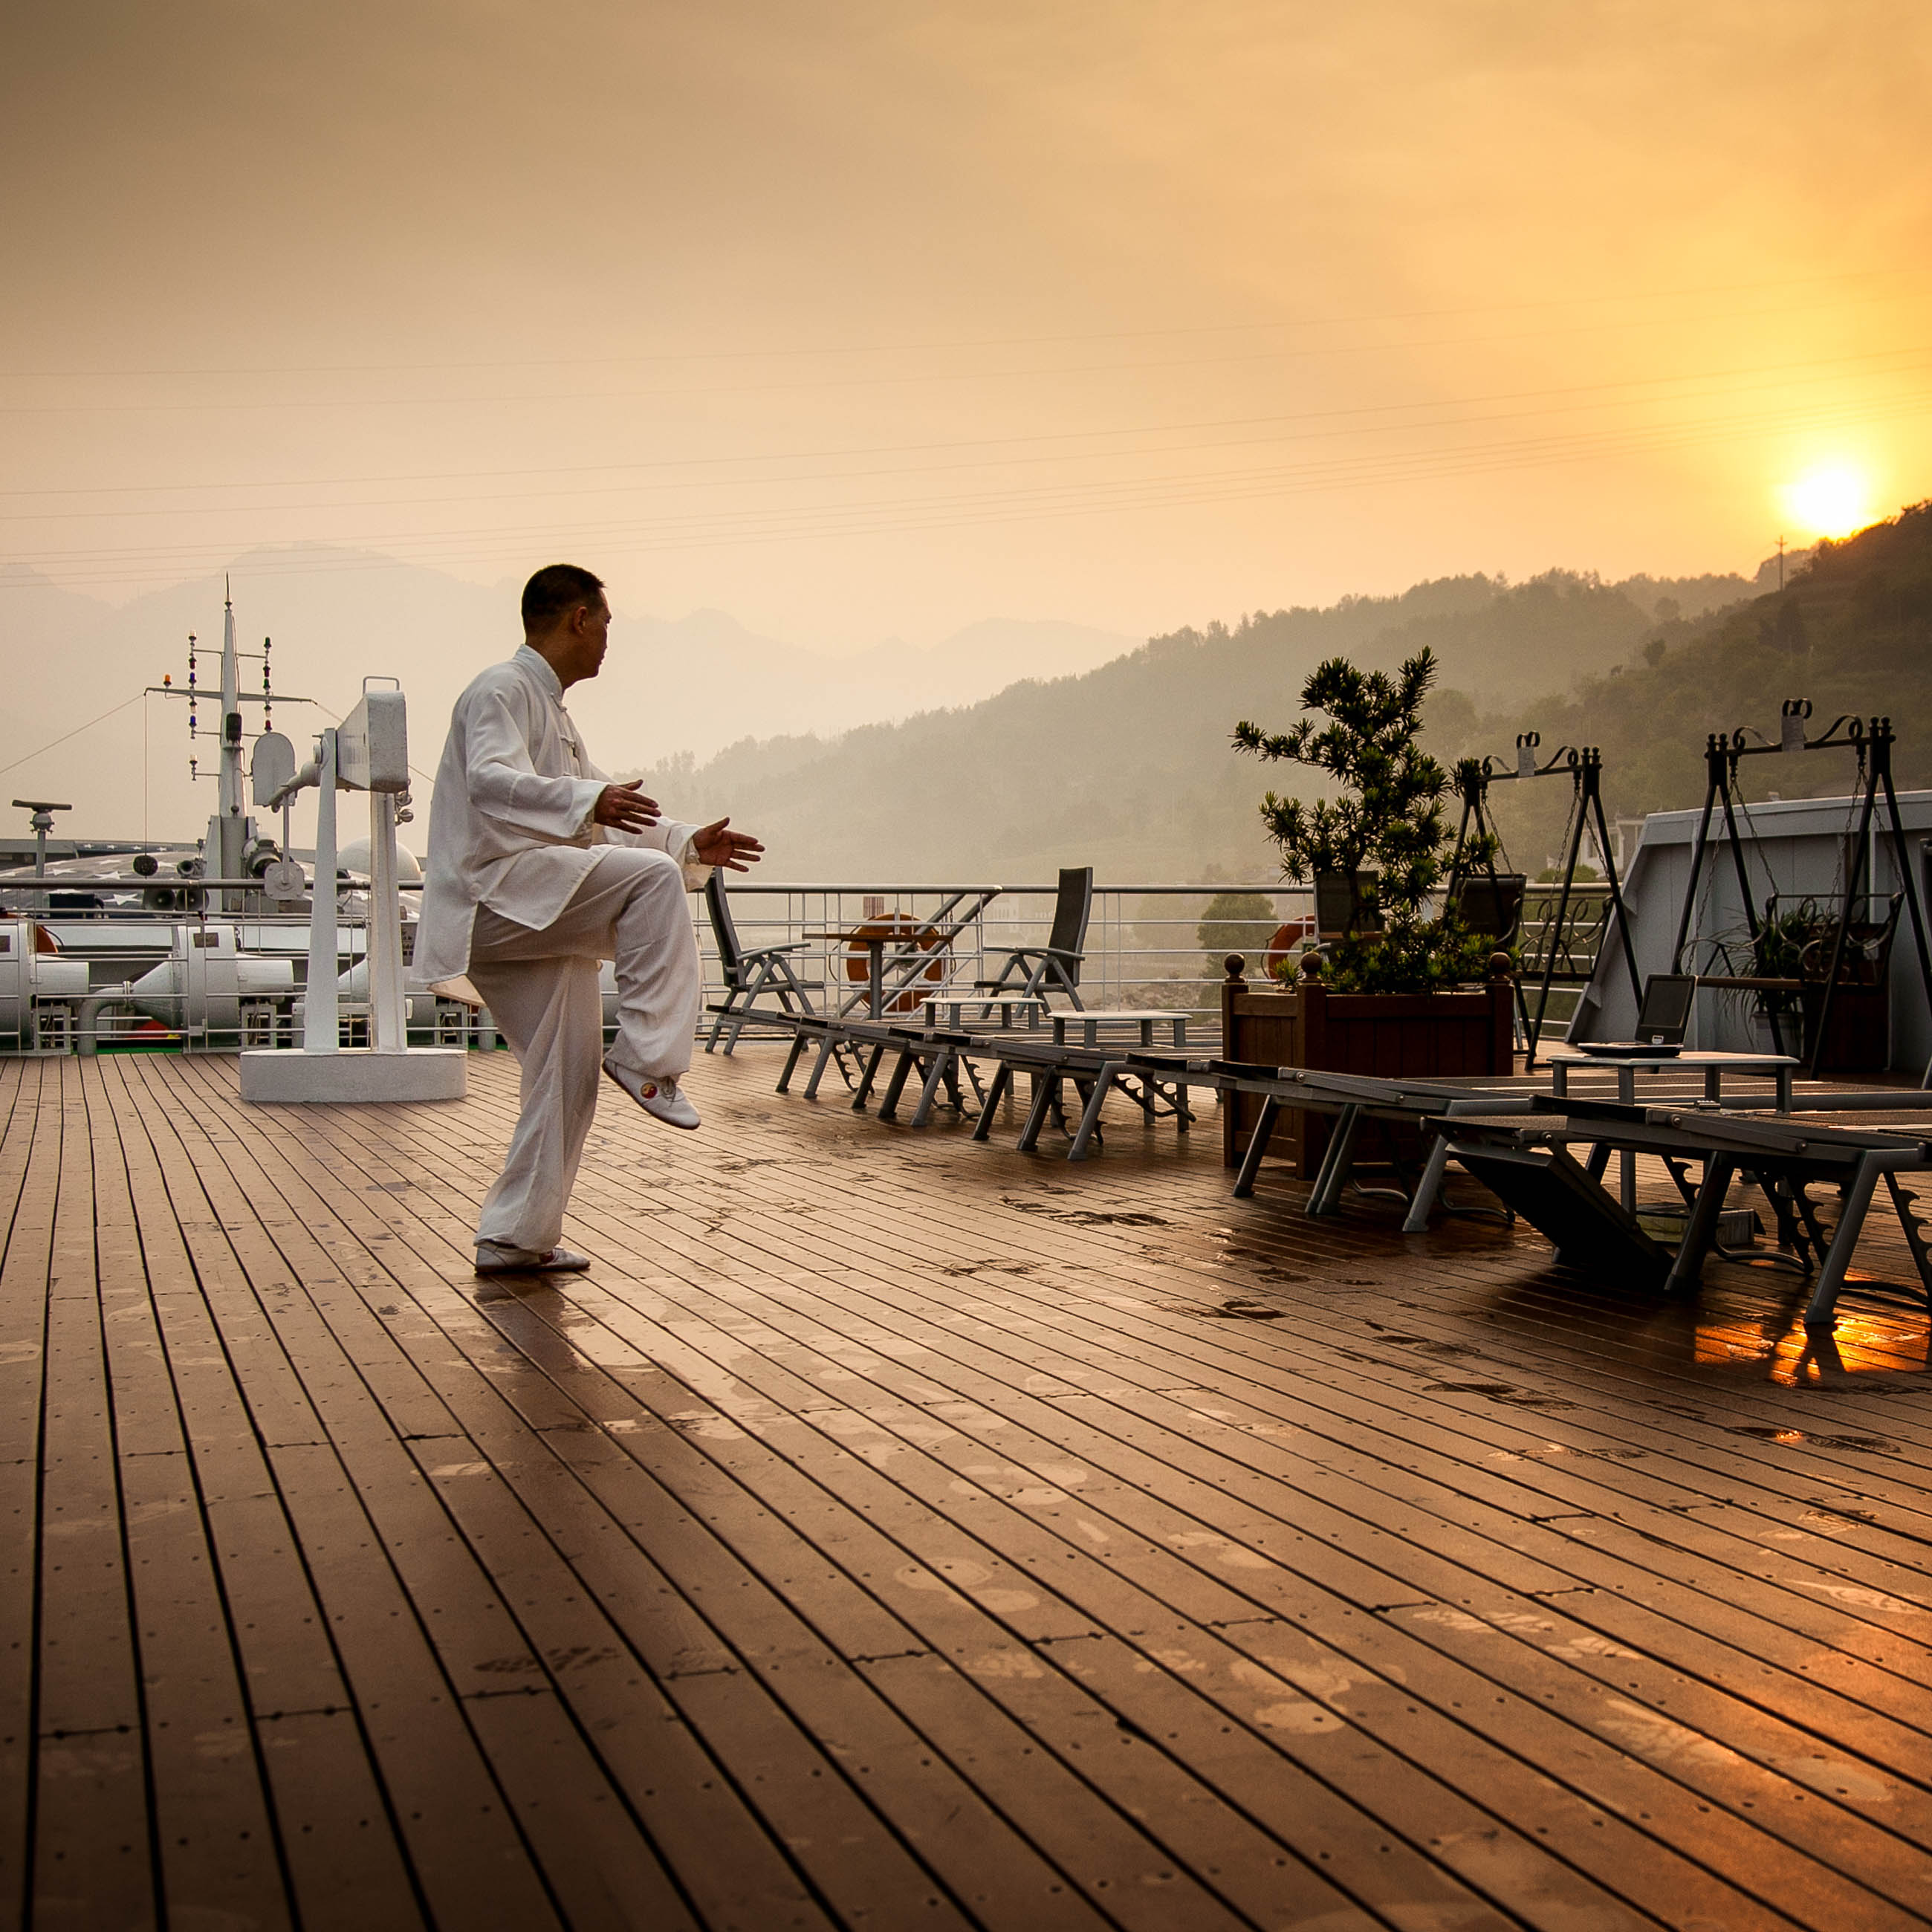
In this scene, I knew exactly where the sun would be getting up in the morning and at which time it would rise over the hill. I also knew at what time the Tai Chi instructor would be warming up because I had gathered the information the day before.
Many applications will give you the exact times of sunrise and sunset and when the “golden hour” will be for an exact position. Here is one that I use frequently.
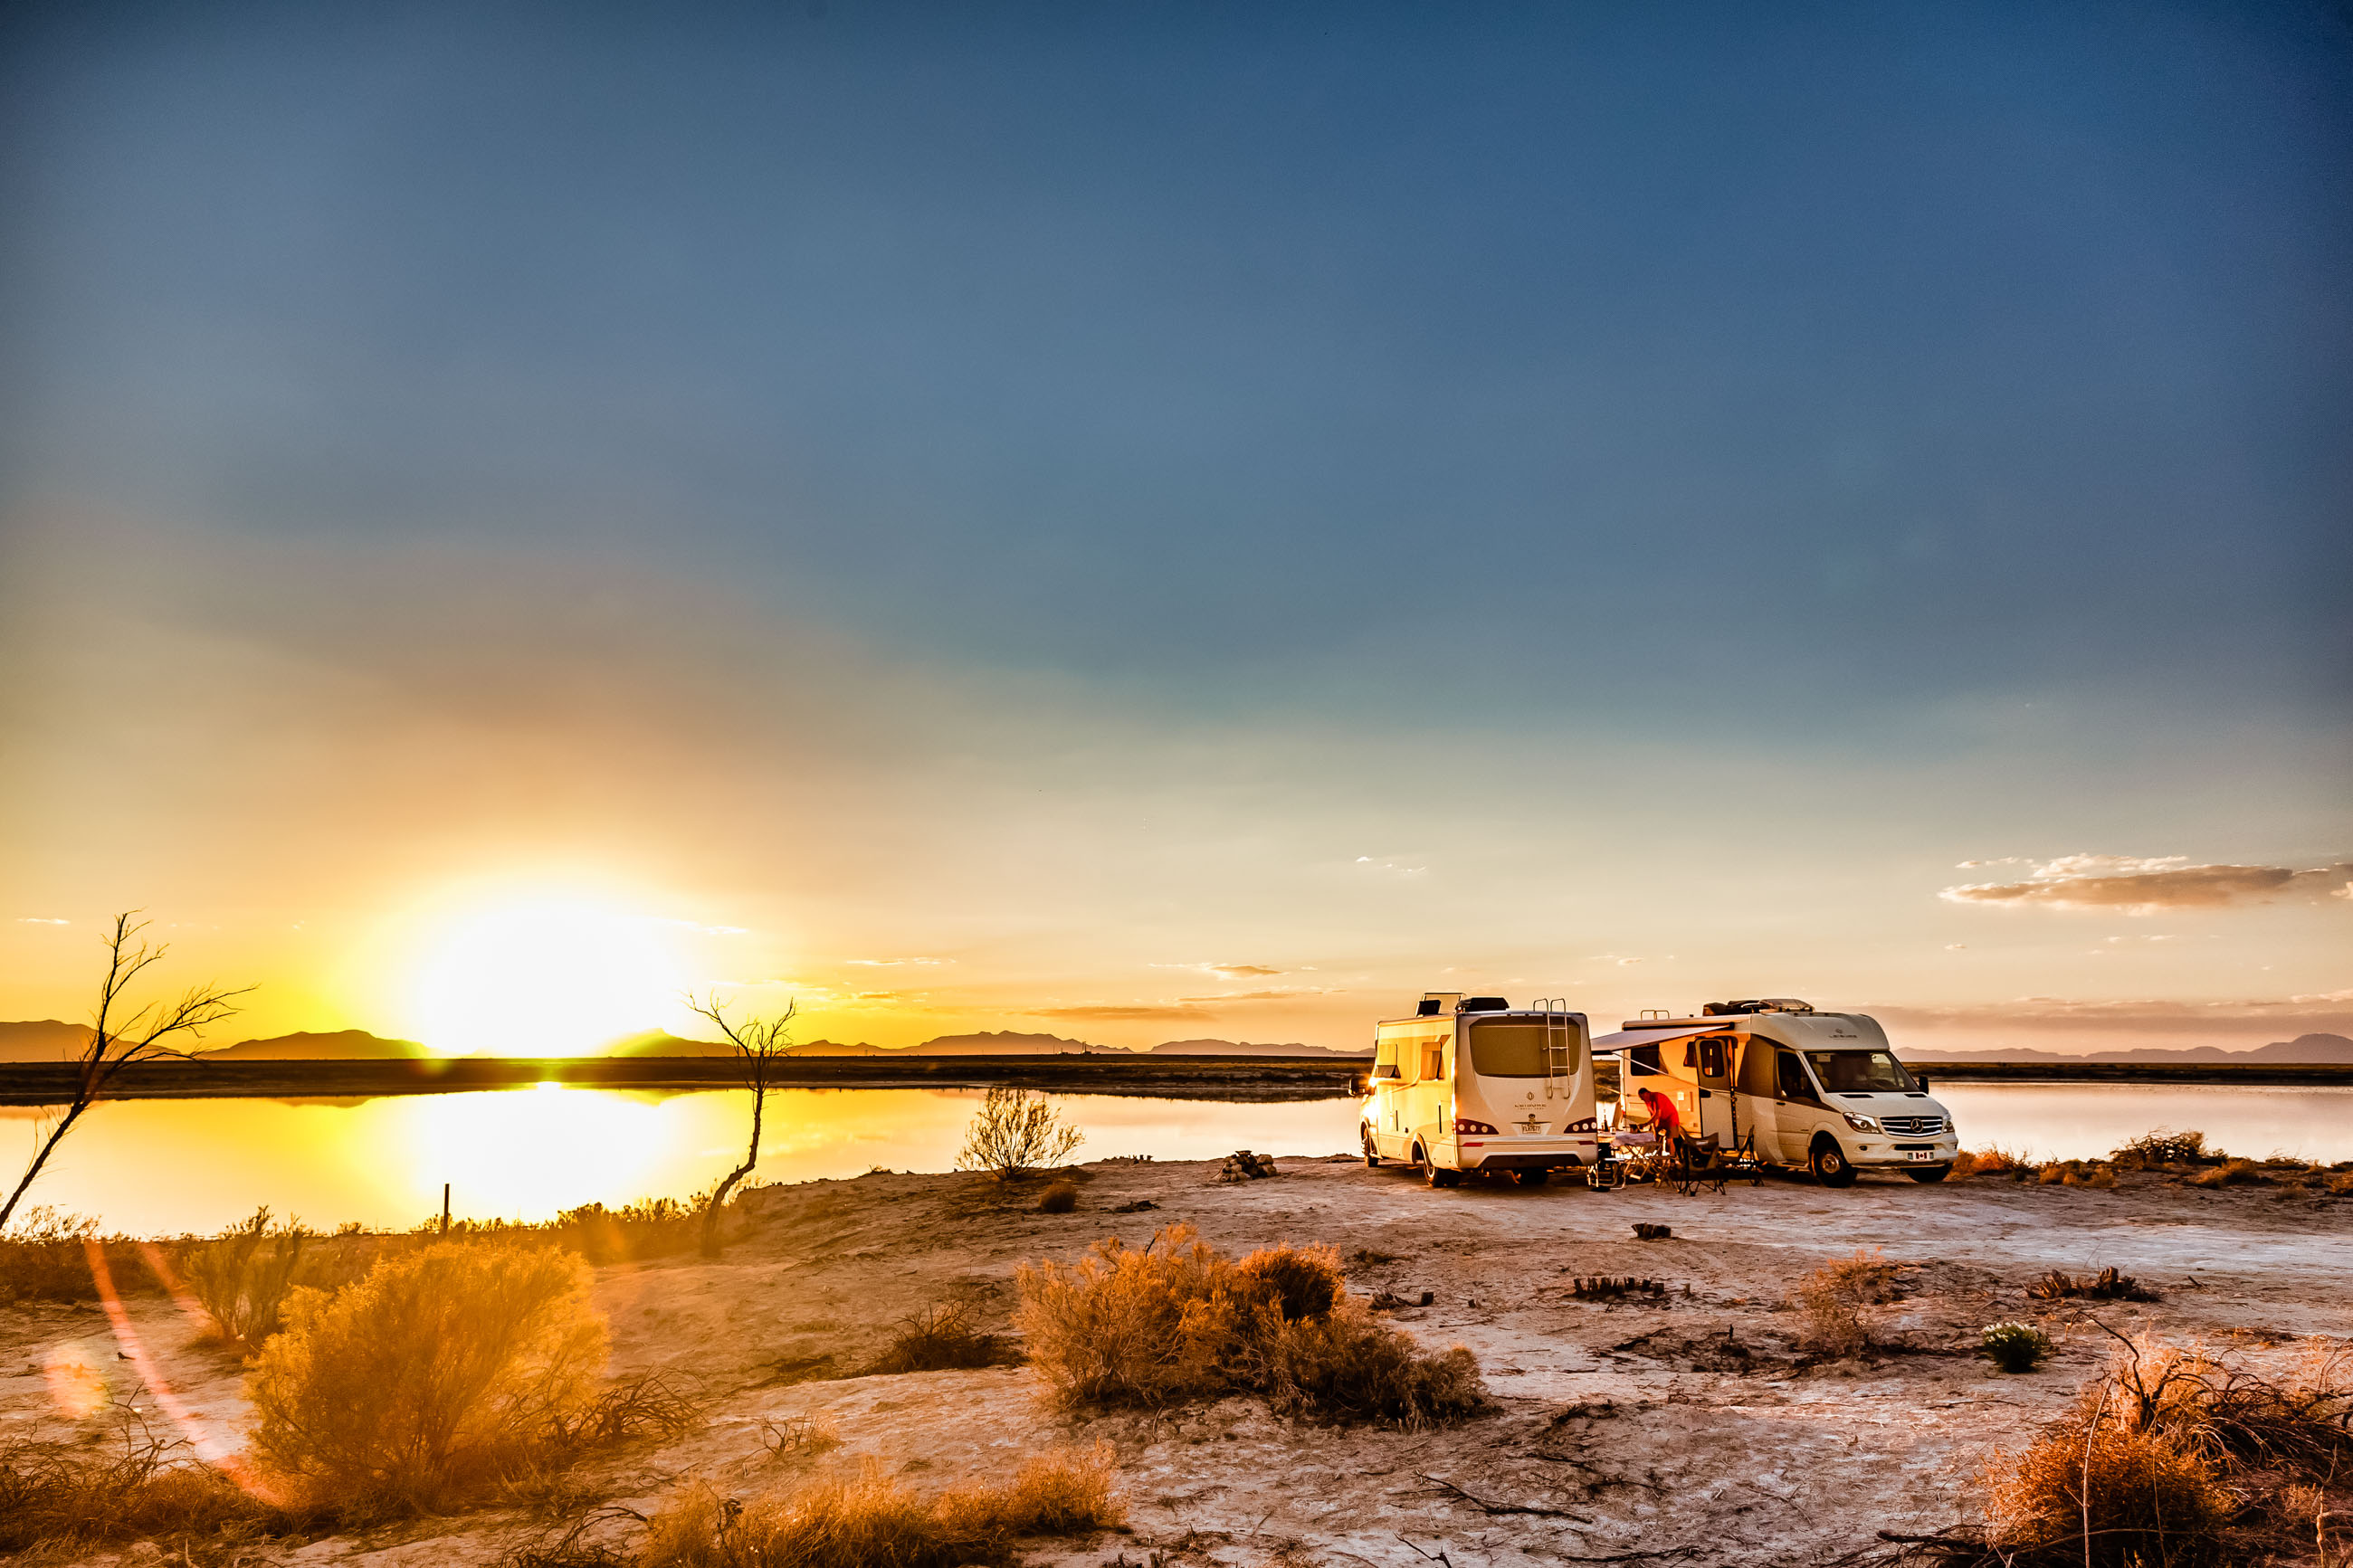
Here is another great light situation. We and our friends were boondocking at a BLM near White Sands National Monument when, as the sun was going down, the quality of light became very interesting. As we traveled throughout New Mexico, we marveled at the beautiful light, especially at dusk and dawn. We later discovered that many artists benefited from the light’s quality in New Mexico and Arizona. (A visit to the Georgia O’Keefe Museum in Santa Fe gave us many examples of this.)
5. Try These Useful Photography Apps
Since we are not performing brain surgery, our mistakes are thankfully safe because unpredictable accidents happen all the time in photography.
Let’s face it; our photos are sometimes good and sometimes bad and some need a little extra seasoning. There are many tools out there available to help us enhance our images. Whether it is using filters in Instagram or other applications available for mobile phones or desktop computers, most will help bring an image to life with just a few clicks.
- Native Mobile Phone Apps. Take the mobile phone for example. Did you know there are fine editing tools built right in the main photo application of your phone? iPhones and Android-based phones have tools that are readily available and easy to use, but many of us never venture into the sub-menus to explore many cool effects. Take a minute to dig in there. You might be surprised.
- Snapseed. One app that is very useful and is regarded as one of the best photo editing apps for mobile devices is Snapseed by Google, available on Android and iOS. It is fairly intuitive and easy to use and will allow the user to enhance an image with a full array of tools. Many advanced users claim it is a very good replacement for Photoshop’s mobile application.
- PicsArt. Another winner is PicsArt also available on both Android and iOS. It was named an Editor’s Choice app by Google.
- Lightroom Mobile. On the road, I use a combination of Lightroom Mobile, which synchronizes with my desktop version when I return home, as well as Snapseed and small adjustments with the native tools on my mobile devices.
Bonus: Slow Down and Use a Tripod
Whether it is taking a picture as an amateur or a professional, I am always thinking about light, composition, and what story I am telling with my image. I also like to slow things down. One of the best ways to do that is by using a tripod. In the days of film and slides, we did not have the instant feedback provided by digital cameras. You wanted to make sure your shot was in focus and well exposed because you would only find out weeks after you had left the area. We took time to walk around a scene like a golfer surveying a putt at the Masters. Tripods force you to slow down, think a little more and allow you to get into an enhanced creative mode. Tripods allow you to take long exposures and avoid camera shake and I always carry one in my motorhome. I also carry a mini tripod in my bag to which can be attached a mobile phone mount.
As a final thought, as we try to capture moments in life as it flies past us, try to always carry a camera with you ’cause you can’t take a picture without it. Your phone will do just fine as any other camera would. I hope you have enjoyed this short overview and my thoughts on making your images snap and sizzle and I look forward to seeing your beautiful images out there.


Comments