A hot shower. After a day of hiking or kayaking, there is nothing better. And when you’re traveling in an RV, you always have a hot shower with you. But carrying your bathroom and kitchen plumbing along with you means there are a few things you’ll need to know in order to keep things running smoothly.
How the RV Plumbing System Works
RVs have a pretty straight-forward plumbing system. Freshwater comes from either a direct campground faucet hook-up or the onboard fresh water holding tank. Water is heated by the water heater and sent to the faucets either by water pressure from the campground faucet or by the onboard water pump. Wastewater exits the RV into either the gray water holding tank or the black water holding tank. When the tanks are full, you empty them at a dump station.
Your RV’s plumbing system can also include a water pressure regulator, water filter, dump hose, macerator, and of course, the “facilities” on board.
Service Bay
Truly the “business” end of the RV plumbing system, the service bay is used on every trip. Get familiar with the variety of valves in the service bay: in addition to the fresh water fill, city water connection, and tank emptying valves, you may also find a winterizing valve, siphon, and maybe even an outdoor shower set up or the cable TV connection!
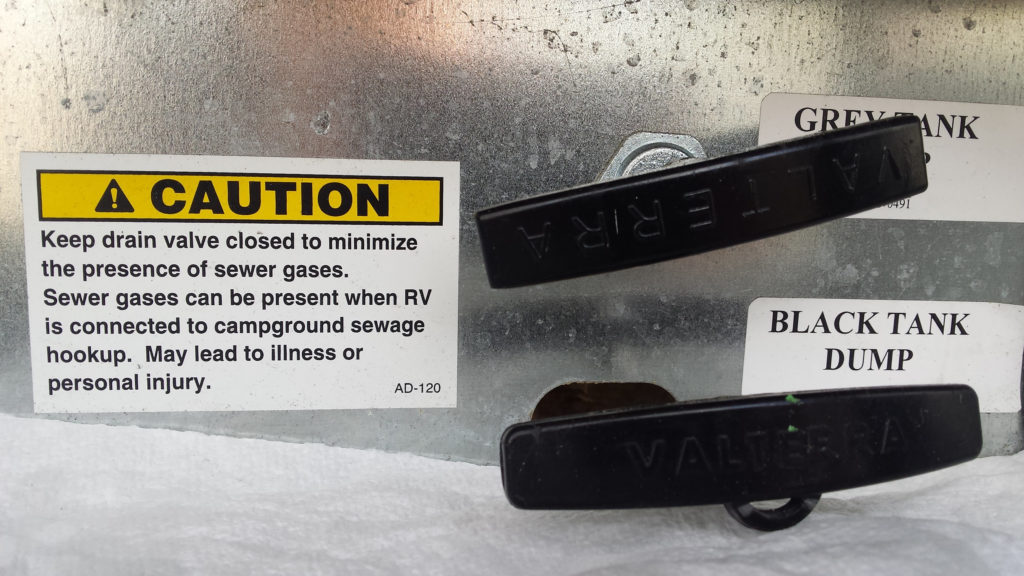
If your holding tanks include a macerator, you may find the switch and hose for that in the service bay too. (If you have a macerator dump hose, remember to remove the cap before dumping).
If your holding tanks use a standard three-inch dump hose, you’ll find the connection in this area as well. The hose may be stored in a different compartment.
Fresh Water: Using a “City Water” Connection
Most RV campgrounds have a city water connection. This is a faucet at your campsite that allows you to connect your RV directly to a city water supply. Just attach a fresh water hose to the campsite faucet and then attach the other end to the “city water” intake on your RV (make sure the valve is turned to the “city water” setting). This will be the water source you use when at an RV resort or campground.

Optional Accessory: Water Pressure Regulator
A city water hook-up is a wonderful convenience when camping – and you won’t run out of the water! However, the pressure of city water can be overpowering for an RV’s small plumbing system, so it’s wise to attach a water pressure regulator to your RV water hose at the city water connection end. Make sure to purchase one that has a gauge and an adjustment valve. The regulator will give a reading of the water pressure at the faucet and allow you to adjust the water pressure going into your RV. Your RV’s documentation will dictate safe water pressure for your model. (If your documentation does not specify a safe pressure, 50 psi is considered safe for most RVs, although larger RVs may accommodate higher water pressure.)
Optional Accessory: An External Water Filter
And, since you probably won’t be checking on water quality everywhere you camp, a water filter attached to your RV’s water hose is also a good idea. It works like any water filter used in the home to filter out chemicals and particulates in the water supply (i.e. lead, contaminants, and microorganisms). Make sure to change the filter cartridge regularly. If your RV comes equipped with a whole-system water filter (such as a Leisure Travel Van), a second filter on the water hose is optional.
Fresh Water: Using the Onboard Fresh Water Holding Tank
When you don’t have a city water connection because you’re “boondocking” (camping in a wilderness area or overnighting in a shopping center parking lot), you’ll need to use your onboard fresh water holding tank.
Some RVs have a hose connection that you simply attach to an outdoor faucet at home or in a campground to fill the water tank, connecting the other end to the freshwater intake valve in the service bay. Others have a siphon-type of arrangement to draw water from a container into the tank.
Depending on your set-up, you may need to turn a valve in the RV service bay to direct water to the fresh water holding tank. Others have a port that is ready to connect a hose without turning any valves.
Check the monitor panel and find the indicator assigned to the fresh water tank. As you fill the fresh water tank, monitor the level so you don’t overfill.
The RV Water Pump
Just having water in the tank doesn’t mean you have water at the RV kitchen sink! When you are using the onboard fresh water tank as your water source, you’ll need to switch on the water pump to move water from the tank to the plumbing lines. In a small RV the water pump is small too, often tucked under a sink or in a cabinet. It runs on electrical power from the coach battery bank.
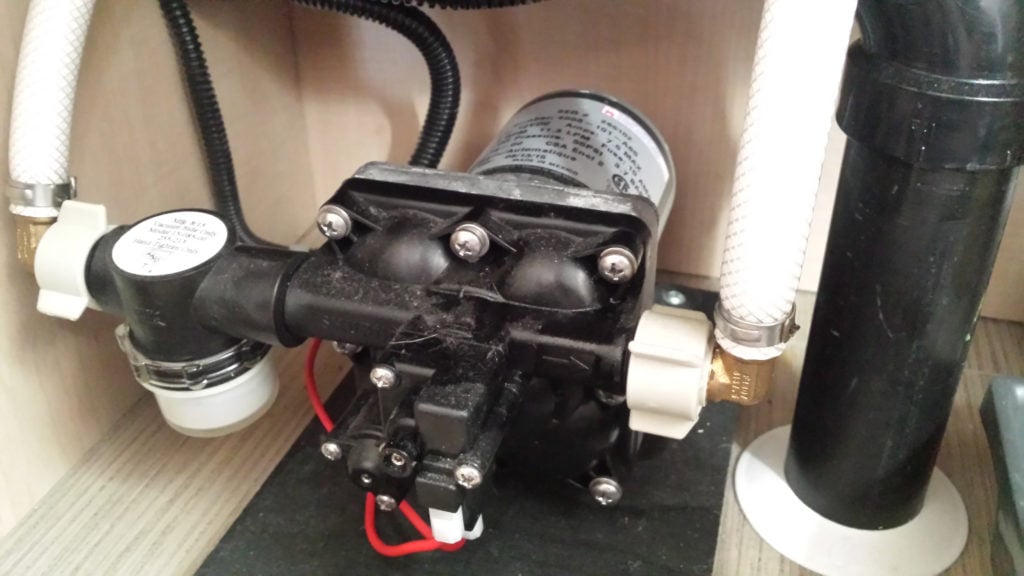
To use the water in the holding tank, you’ll turn on the water pump, give it a minute to fill the plumbing lines, then turn on the faucet or shower, or use the toilet. The water pump can be noisy as it charges the lines but will quiet down when the lines are filled with water. You may hear it go on and off as you use water from the tank since it’s pumping water into the lines to replace what you use.
For hot water, if you don’t have the Truma AquaGo Comfort Plus system, you’ll need to let the water heater fill (check to be sure the water heater “bypass” valve is turned to the “normal” position) and wait for it to heat the water.
Keep an eye on your fresh water tank level as you use water so that you don’t run out of water or run the water pump “dry” – running the water pump without water can damage the motor.
Note: Do not use the water pump when connected to city water. The pressure from the city water connection will be enough to pump water through the RV’s plumbing system.
The RV Water Heater
That hot shower you’re looking forward to requires a water heater. There are two types of water heaters in today’s small RVs.

The first is the standard six-gallon propane and/or electric water heater, which works like the one in your home. It heats a tank of water and, as you use the hot water, it refills with cold water. If you use more than the six gallons, you’ll run out of hot water and must wait while the fresh supply is heated. The standard six-gallon water heater allows for two short showers without running out of hot water. Recovery time varies, but our experience has been pretty consistent with less than 20 minutes for full heat recovery between uses.
Most of the standard water heaters that use propane come equipped with electronic ignition. You flip a switch inside the RV, and the water heater pilot ignites. If your RV doesn’t have this feature, you will have to light the pilot manually after your RV is parked and leveled. If you are using an electric water heater, it is a simple matter to turn on the water heater and wait for it to heat the water.
The second type of water heater is the tankless variety (such as the Truma AquaGo), which creates a continuous flow of hot water on demand. It has a very small reservoir of heated water, and when you turn on the hot water tap, the tankless water heater begins to heat the water flowing through its system. By the time the initial supply is used, the burners are heating the flowing water sufficiently.
Tankless water heaters can be powered by either electricity or propane and, in fact, use less propane than the standard water heater since there is no big tank of water to keep hot.
Regardless of which type of water heater you have, the length of a shower is determined more by the level of the gray water holding tank than by the water heater’s capacity!
RV Toilets
The standard RV toilet is basically a “drop flush,” but there are also electronic models (macerator toilets, like the ones found in the Unity Island Bed and Twin Bed models). Both electronic and drop-flush toilets empty waste into the black water holding tank.
The toilet flush mechanism is typically a foot pedal at the base of the toilet. When depressed, the pedal opens a portal in the bottom of the toilet, allowing waste to drop into the black holding tank. Some units have a sprayer attachment to help clean the toilet when flushing. Both the pedal mechanism and the sprayer attachment use fresh water to flush the toilet.
Electronic flush toilets have a push button to take care of flushing and may also have stronger water flow to evacuate the bowl more effectively.
RV Sinks and Showers
Your sinks and shower draw fresh water from either the city water hook up or, when boondocking, from the fresh water holding tank.
Many RV shower heads have a “pause” function that allows you to pause the flow of water momentarily, then resume at the same temperature and pressure. This is used to conserve water during showering: wet down, pause, soap up, resume and rinse! This is a serious consideration when using only the onboard fresh water tank.
The Holding Tank Monitor Panel
RVs usually have an electronic tank monitor panel where you can see the level in each of the holding tanks. This lets you know when to add fresh water and when you need to empty the gray and black water holding tanks. Keep an eye on tank levels and plan on emptying at the campground’s dump station every couple of days. Frequency will depend on your water use, of course!
The holding tanks are mounted under the RV floor and connected to the sinks, shower, and toilet. They also have an exterior connection for adding fresh water and an exit valve to empty or “dump” the gray and black water holding tanks.
Take a little time to read up on your RV’s plumbing documentation and the maintenance each component requires. When the water flows, RVers are happy campers!

Comments