
Use this guide to winterize the plumbing in a Unity or Wonder equipped with the Truma AquaGo Comfort Plus water heater. Drain and valve locations vary by model and floor plan. If your water heater or valve arrangement differs, use the winterization instructions for your installed equipment.
Before you begin
Have RV plumbing antifreeze suitable for potable-water systems, towels, a collection container, and the water-filter canister wrench, if equipped. Never use automotive antifreeze.
For the San-T-Flush line, have a compatible air blowout plug and a regulated compressed-air supply. Verify the allowable pressure in your coach or component instructions before use.
Arrange access to a dump station for the black and grey tanks and the macerator, if equipped.
Prevent scalding and equipment damage: Turn the water heater off and let it cool before draining. Keep antifreeze and compressed air out of the water heater itself. Turn the pump off and release line pressure before removing filters or initially pressing the city-water check valve.
1. Empty the tanks and cool the water heater
Check the tank-level display. Empty the black and grey tanks at a dump station.
Turn the water heater off at its interior control. If your heater also has the exterior switch shown, set that switch to its middle, Off position.
Make sure the heater is cool to the touch. If it is still hot and you have a water supply, run the hot-water faucet to help cool it. Otherwise, let it cool before continuing.
Open the fresh-water tank drain and let the tank empty completely. Depending on the floor plan, the drain is outside under the coach or inside under a bed. The drain can remain open during winter storage.
Disconnect city water. With the fresh tank empty, briefly turn on the water pump and open a couple of faucets to clear residual water from the lines. Turn the pump off.
2. Depressurize and drain the water heater
With city water disconnected and the pump off, open both hot and cold lines to release pressure. A mixer faucet can be opened midway between hot and cold. Leave it open while draining the heater.
At the exterior Truma compartment, confirm the heater is cool. Release the black retaining tab and lower the yellow drain lever fully. Stand clear of the draining water.
Remove the water inlet filter completely, rinse it, and store it inside the coach. Leave this filter out of the heater during winter storage.
Once the heater has drained, raise and secure the yellow lever, then close the heater door.
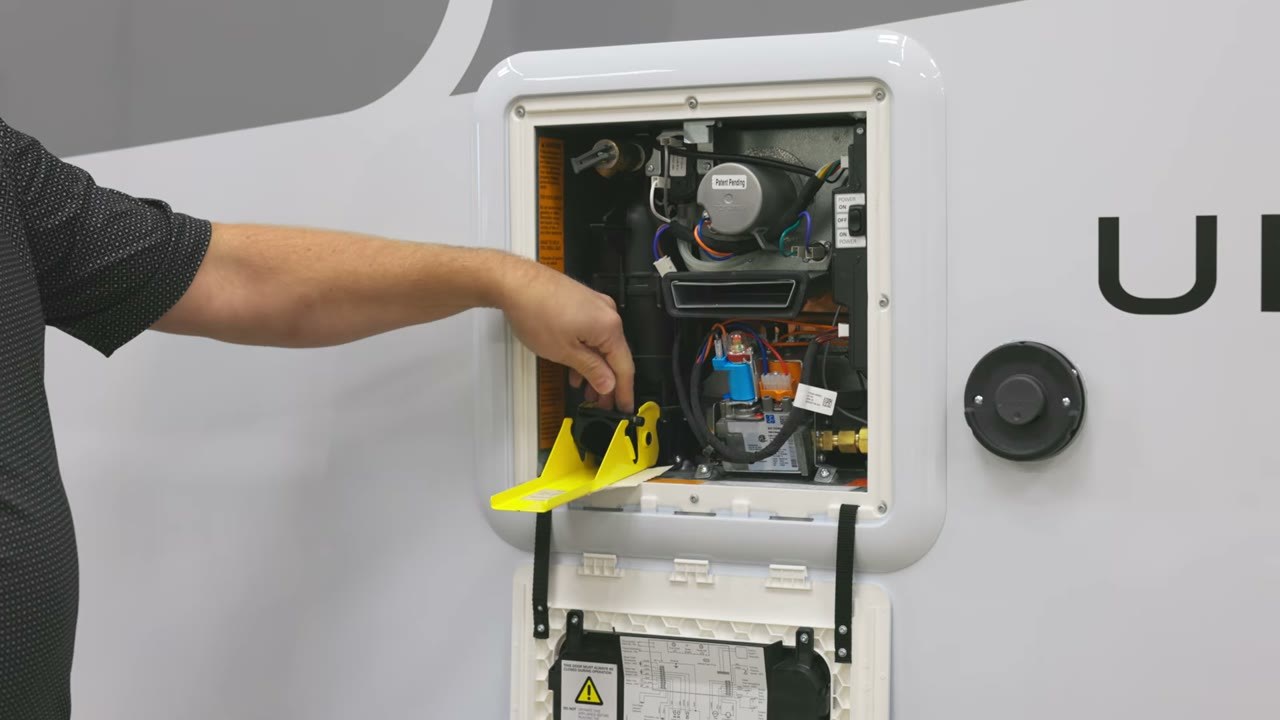
The yellow drain lever is lowered before the inlet filter is removed. Watch at 3:24.
3. Set the five-valve water-heater bypass
Locate the valves labelled A, B, C, D and E. A handle parallel to its water line is open; a handle perpendicular to its line is closed. Use the line direction, rather than whether the handle looks horizontal or vertical.
Close A, B, D and E.
Open C.
Keep A, B and E closed and C open through the remaining steps. Valve D is opened briefly later to winterize the circulation drain line.
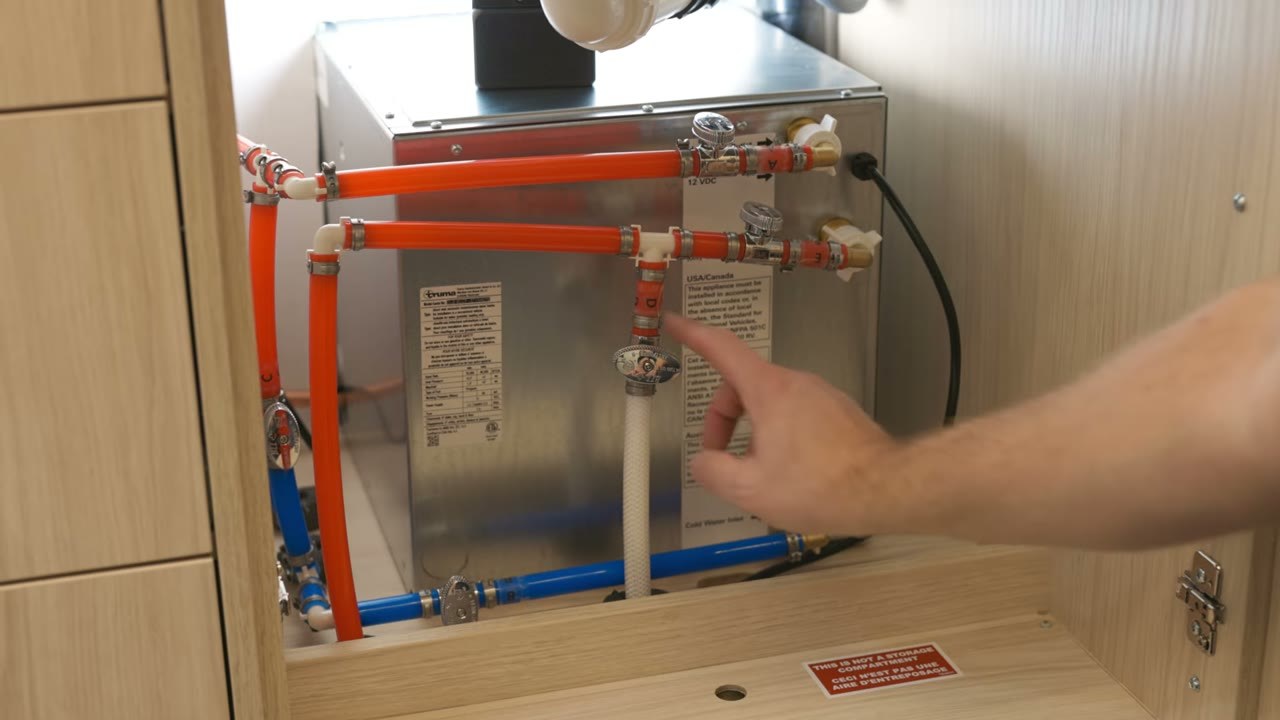
The five-valve assembly in bypass mode; D is on the central drain line. Watch at 4:43.
4. Prepare the filter canister and antifreeze pickup
If a charcoal water-filter canister is installed, place towels and a container underneath it. With the pump off and pressure released, remove the canister, remove the charcoal cartridge, and empty the water. Reinstall the empty canister before turning on the pump. Keep its O-ring seated and tighten by hand; use the wrench only to loosen it.
In the service compartment, set the water-fill selector to Normal & City Water. Leave the city-water hose disconnected.
Set the separate winterize valve to Winterize.
Place the free end of the winterization pickup hose into the RV-antifreeze jug so the pump can draw antifreeze.
Close the faucets opened to release pressure, then turn on the water pump.
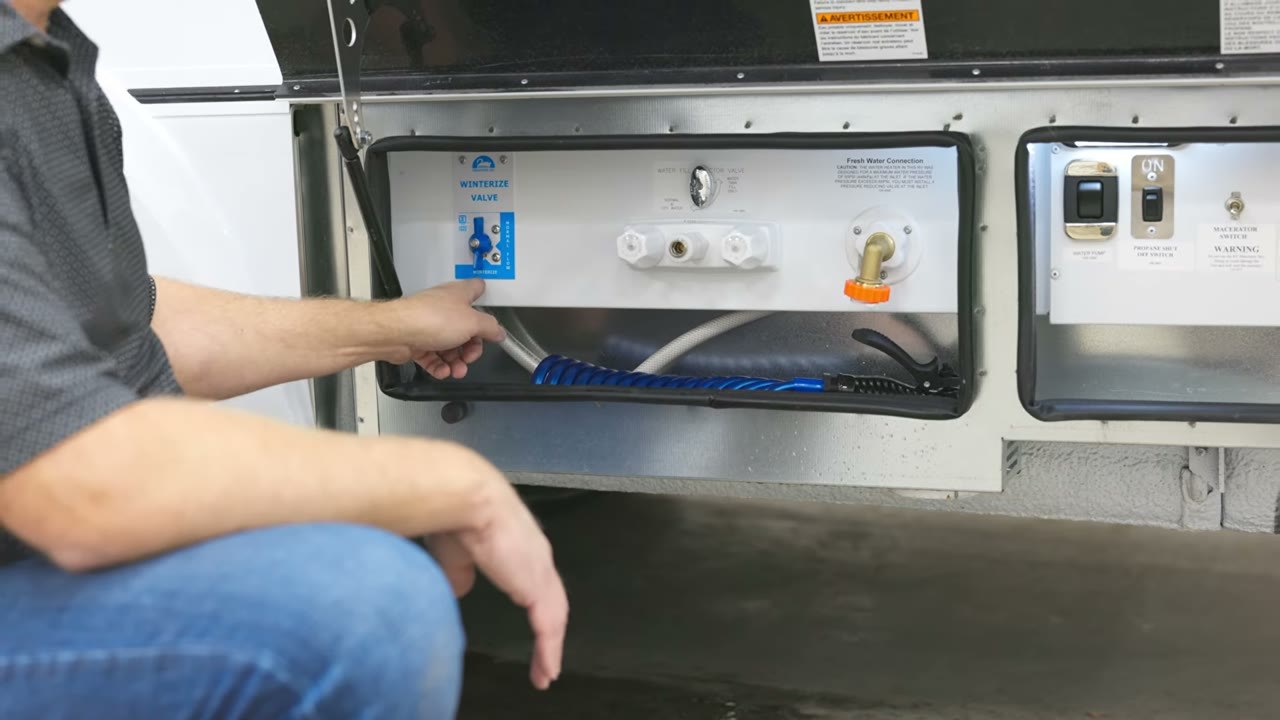
The winterize valve and water-fill selector are separate controls. Watch at 5:46.
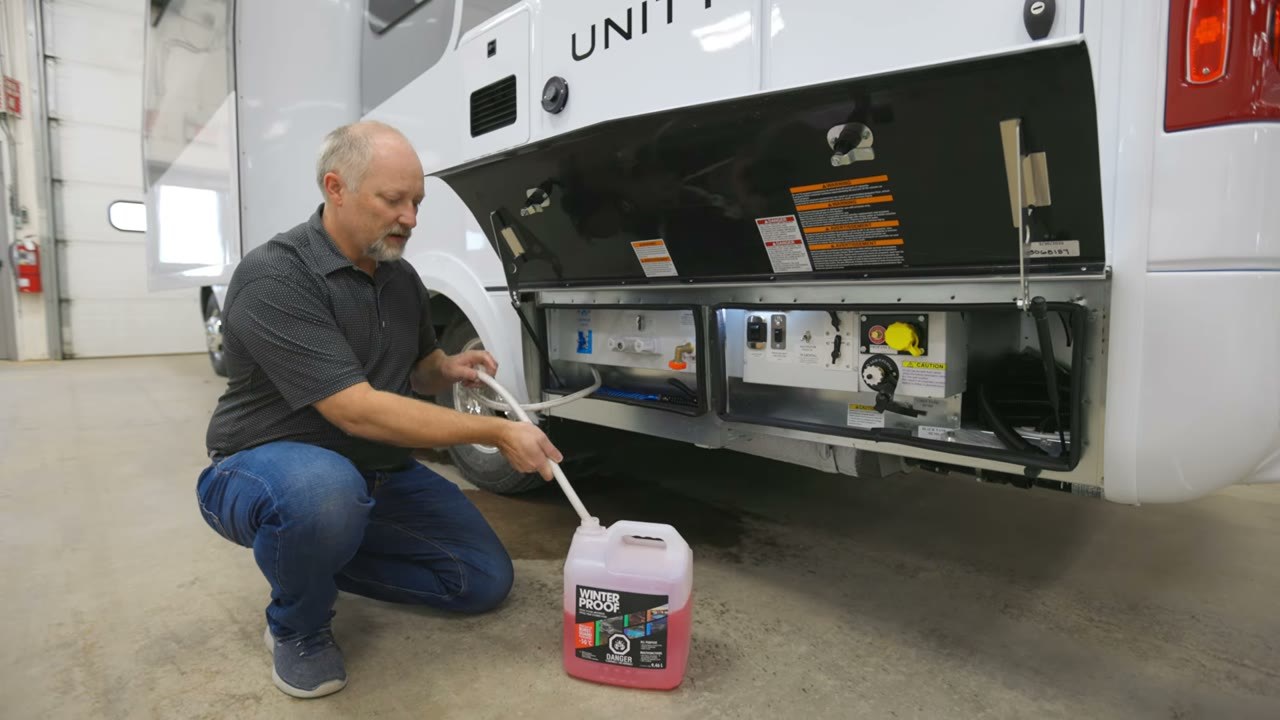
The free end of the pickup hose draws antifreeze from the jug. Watch at 6:07.
5. Run pink antifreeze through every fixture
Work through each fixture one at a time. At every hot-and-cold fixture, run the cold side until only pink antifreeze comes out, then repeat on the hot side. Close the fixture when finished.
Galley faucet
Bathroom vanity faucet
Interior shower, including its hose and showerhead
Toilet flush and toilet spray wand, if equipped
Exterior shower, including its hose and showerhead, if equipped
On the shower control shown, begin slowly on the cold side. Once pink antifreeze flows, move the control to hot and repeat. Turning it straight to full hot can leave the cold line untreated.
With the pump still drawing antifreeze, open valve D for several seconds until pink antifreeze appears at its exterior drain. Collect the discharge in a suitable container; a second person can help confirm the colour.
Close valve D once pink antifreeze is visible.
Turn the water pump off. Open the hot and cold lines again to release pressure.
6. Protect the city-water connection
Release pressure before initially pressing the check valve. Pressing it while the lines are pressurized can dislodge its seal and require replacement of the fill valve.
With the pump off and line pressure released, remove the screen and gasket from the city-water connection.
Gently press the check valve inside the connection until antifreeze comes out.
If no antifreeze appears, keep the check valve held in and briefly turn the pump on for one second, then turn it off again.
Reinstall the screen and gasket fully seated, with the screen's projecting side facing outward so it does not hold the check valve open.
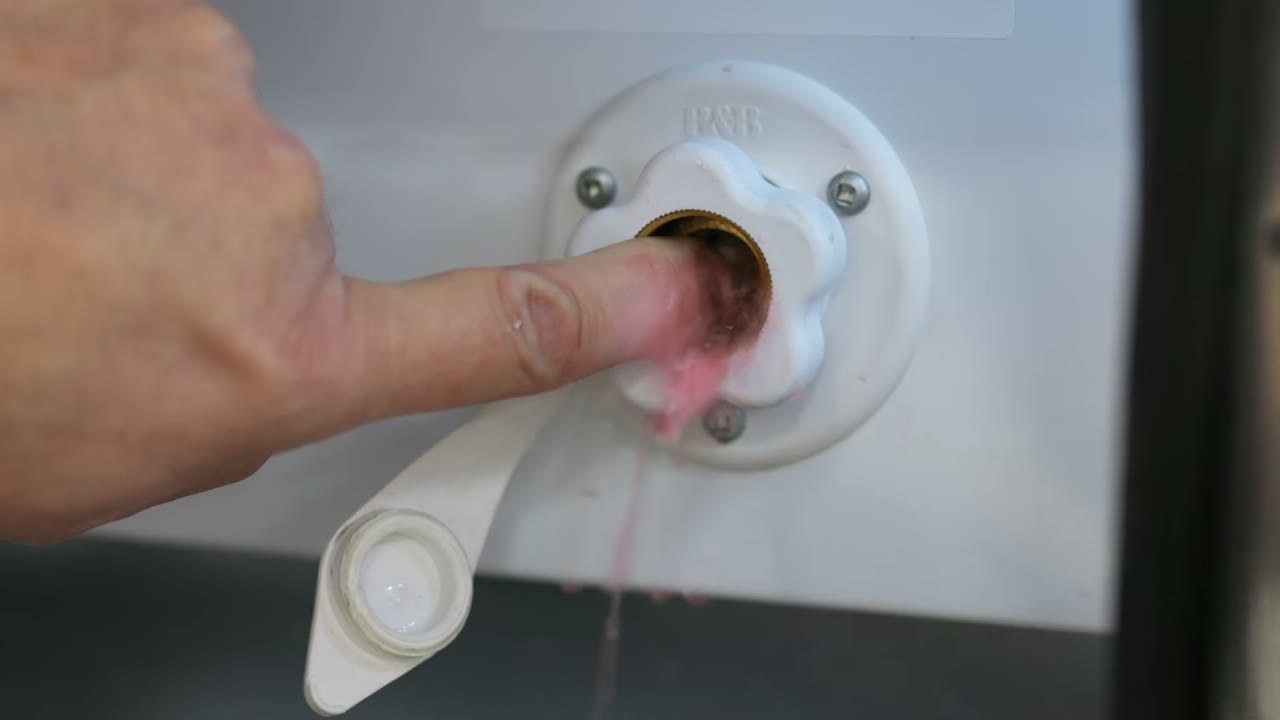
Pink antifreeze confirms that the city-water inlet has been protected. Depressurize before pressing the valve. Watch at 8:34.
7. Clear the San-T-Flush line and macerator
If equipped, attach a compatible air blowout plug to the San-T-Flush black-tank rinse connection. This is a separate connection from the fresh/city-water inlet.
Following your coach or component pressure limit, blow out this rinse line with regulated compressed air for approximately 5–10 seconds, then remove the air supply. Do not put antifreeze through the San-T-Flush connection. This is an optional step.
If the coach has a macerator, with antifreeze in the black tank, run the macerator long enough to move antifreeze through the pump and discharge hose, then switch it off. Discharge at a dump station or collect it for disposal there.
Drain the remaining black- and grey-tank fluid at a dump station using the macerator, if equipped, or the 3-inch dump hose.
8. Drain the filters and finish
Return the service-compartment winterize pickup valve to Normal Flow. This is separate from the water-heater bypass: leave the heater bypassed, with A, B, D and E closed and C open.
Confirm the pump is off and line pressure is released. Place towels and a container under the water-pump inlet strainer. Remove its bowl and drain the remaining fluid into the container, not into a coach drain. Clean the screen, check that the screen and gasket are seated, and reinstall the bowl hand-tight.
If equipped, remove the water-filter canister again and drain its remaining fluid into the container, not into a coach drain. Check its O-ring and reinstall the empty canister by hand. Leave the charcoal cartridge out until de-winterization; replace it then.
Wipe antifreeze residue from sinks and the shower pan. Leave the water heater off and its inlet filter stored inside the coach until de-winterization.
Before storing: Confirm that every listed fixture produced pink antifreeze, the city-water inlet and circulation drain were treated, fitted rinse/macerator equipment was addressed, and both filter housings were drained and reinstalled.


